This is a West Dean course - www.westdean.org.uk - and entailed 5 days of drawing with different tutors each day. After the introductory weekend this is the first course in the FDAD that I have just started.

The introduction was by David Stent on Sunday night who gave a short talk on William Coldstream and Ewan Uglow. Incredible draughtsmen who spent a long time making sure that their measurements and proportions of the individuals they drew were very accurate. Their drawings and paintings are noticeable not least for the construction lines that remain in the work. A hard days concentration, drawing, measuring, rejecting and re-drawing followed. I am still not sure whether the measurements in my final drawing are correct but I do like the fore shorted foot!. My conclusion here is that I realise I would benefit from spending more time making sure of the proportions in life drawing. Something I was aware of before but had not acted upon.
The next day something totally different. Frances Hatch
http://www.franceshatch.co.uk/ aims to incorporate her emotional responses to the landscape, and often that includes her impressions of the noises around her whether they are natural such as birds and winds or mechanical such as a CD playing in the background. Frances started by playing us some music and asking us to respond in various ways with a variety of implements and media. We were drawing on some discarded brown paper which had been crumbled and then straightened so not precious and everyone seemed prepared and ready to thrown themselves into it. The resulting pieces covered a huge range from abstract and wild to realistic and restrained. This set the mood for the day as we progressed through a series of exercises using collage - some from the first pieces which had been reduced to small cuttings, the discarded pieces providing useful collage material. Frances introduced us to 'Oblique strategies" a set of cards used for making decisions -
www.rtqe.net/ObliqueStrategies/.

Frances gave us all a card and asked us to consider how it could help us with the collage that we were working on. The one given to me seemed to bear no relationship at all but gradually the thought came to me that I hadn't liked one of the marks I had made as a direct response to one of the
instructions Frances had given us. The comment of the card led me to the thought that the mark was restricting and that I could break it - this I did with collage pieces and think the final piece benefits.
The strategy I found today when I looked was 'Define an area as 'safe' and use it as an anchor' - will have to think how that impacts on my current art project of portraits!
The third day was with Emily Ball.
http://emilyball.net/ By this time most of us were flagging with the usual midweek slump of energy. Emily came in with lots of ideas and energy. We spent some time just making marks with charcoal - an enjoyable exercise that never fails to surprise and delight. We practised making light and dark and changing the weight of the lines - very basic but something we all need to be reminded of from time to time. We then held hands with a partner and described the hand of the person just by touch - my drawing looked nothing like a hand unlike some of the otheres but I was surprised how much information for a drawing could be found just by touch alone.

This prepared us for the next exercise - holding a small object hidden from sight and drawing it, using
the marks we made as a direct response to the touch and feel of the object. I enjoyed this and I feel it has helped me to become more aware of the range of marks and how the viewer responds to them. I had already been looking at Van Gogh's mark making in his drawings so was very aware of how boringly nondescript my mark making was.
Emily told us the aim was to "Animate the inanimate" or to give life to the objects we were drawing by being aware of them three dimensionally and trying to give an awareness to the viewer of that. I used the same little dried up fish as inspiration for all three drawings - amazing how they differ.

Another exercise, again in partnership, was a drawing where we took turns to add, remove and replace elements of the drawings - this required us to respond to marks rather than being allowed to be precious about certain marks or passages which we were pleased with but that didn't necessarily balance or add to the rest. As individuals we can be very parochial and wrongly decide to keep something that we have worked hard on but which is spoiling a painting or drawing but when working with another person it is easier to see the whole and, of course, they and you, can take the decision more easily to remove, rearrange that precious part since the emotional tie isn't the same. An interesting exercise and one I intend to utilise with mono print.
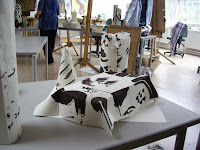
The fourth day was with Carolyn Genders -
http://www.carolyngenders.co.uk/ a ceramicist so someone who automatically thinks in the round - a sharp learning curve for me. The day was a journey from 2 dimensions to 3 back to 2 and then back to 3 involving paper and finally clay. Mark making was an important element again but this time noticing how marks made in 2D look when incorporated into three dimensions. An interesting discussion regarding the difference between shape and form was not fully resolved to my mind but perhaps I need to study more 3D work and undertake a course to fully understand it. This was only the third time I had worked in clay apart from a very disappointing evening class over thirty years ago and these latest experiences all within the last few weeks, so I was very surprised how much I enjoyed the clay.A future course is planned to help develop an awareness of the 3D which I hope will help with 2D work.
The final day was with Martin Ward
http://martinward.net/gallery.htm This was a short day being the last of the course and stared with a block of wood - we were asked to place it in a position with other elements to give it sculptural significance and drawing it.


After that we arranged for the block to be cut into two to our individual requirements - placed the two elements in a different location and
again drew them. Apart from being very tired and having difficulty with angles, proportions and straight lines I enjoyed the exercise. Not much mark making in my efforts compared to most others in the group, and I was a lot less imaginative in the placement but I felt the mass of the wood was shown. I have shown placement of the blocks as the 3D is more interesting to me than my drawings.
The course developed during the week, each day standing independently but in fact building on the previous days and, I feel, coming in full circle with angles and proportions and measurement.
On reflection, I felt that I learnt something new each day, the main being that when representing something in 2D, it is essential to be aware and try to make the viewer aware of the fact that it is 3D - a variation in mark making, weight of the mark and portraying the mass of the object can help with this as well as accurate observation.
Taking time to look before plunging in with the charcoal, pencil or brush or cutting tool is the most important message I have brought away with me - something that was repeated by each and every tutor.
 I chose a plant because I became fascinated with the negative spaces between the leaves and first drew a small thumbnail of the spaces in a selected part and then repeated it by drawing the leaves themselves. It is interesting how different, yet similar, these are. I prefer the second of the drawings - it seems more balanced as a design.
 I then drew a larger drawing of a segment, really enjoying pushing the charcoal around, and found myself responding to the shapes of the leaves etc. The feedback on this was that it might be more effective if the darks, or some of them at least, were darker. I will carry on working on this and recording the changes.
 The plant was very colourful, with a yellow and red bract so I decided on collage for my next piece. I only had a small pack of materials with me - magazine pictures and photocopies of some of my own pictures so was limited in choice but this was useful as I had to make do and be more creative with my response. I drew the plant on top of the collage in black felt tip to emphasise the shape.
 Later when I was uploading photographs of this, I accidentally zoomed onto a part of it and was surprised by the result. It has potential for further development - perhaps into print.


 After lunch I had a look at another plant - a succulent with a stem of very small flowers. I enlarged them, trying to identify the structure - finding this difficult without a magnifying glass and then used these drawings as a basis to draw larger and then larger still in light sienna and black drawing inks.