Tuesday 1 May 2012

Assignment 1 in the post

Well it took nearly 3 months and a lot of blood sweat and tears but the first assignment is in the post - big sign of relief.

The first project was a natural landscape. I knew from reading the project details that the subject would be the Cedars at Attingham Park in Shropshire.  After several trips I had made about 25 sketches including our drawings.  I had two false starts, thinking first of a woodcut, then a multi-plate lino cut - neither of which were successful - my technical ability exceeded my ambition - but I had interesting experiments along the way in colour and inking and these will stand me in good stead.  I enjoy colour practise with watercolour and pastel so consider this to time usefully spent rather than wasted.  However,I settled on a dry point because,quite frankly, I was getting bored of the subject!  This is something I need to watch for in future projects. Here is the final print for project 1.


Project 2 called for an urban landscape. Again the choice of subject was not difficult. There is a small lane in Shrewsbury called Grope Lane. I had used the subject previously and not been satisfied with the result so of I went armed again with sketchbook.  Several sketches and visits later I came up with a design I was satisfied with. I decided on a collograph using techniques I learnt last year in a workshop organised by my Art Society with the Sidney Nolan Trust.  Again an ambitious project due to the angles, lines and complexity and also because I chose to try cutting some very fine lines to add texture and define paving, windows etc.  After two coats of shellac in a well ventilated room the plate was as ready as it was going to be.

The inking wasn't an issue but the cleaning and removing ink before printing took a lot of practise and many prints before I came up with an image half way acceptable.

The third project was a reduction lino cut of an abstraction of an urban scene. I had to start with an A3 line drawing and again I chose Grope Lane as the subject.  This time from the other end of the lane. I then had to make four small (5x4 cms) drawings of different parts of the drawing to put together in an abstract design. I refined the design trying to ensure it balanced and then did a black, grey and white painting, again changing lines and tones to try to make the whole design balanced n shape, colour and tone. 

With a reduction print, the first choice is what to retain as white(or the colour of the paper) and this is cut out first. Then I made the prints - in this case in grey ink - thinking carefully of the number of the prints I wanted as there is no going back to make more - hence the other term for the technique - suicide print.

Here is the block after the first cut and before printing in grey .  You can see the marks left where I have removed the lino, everything else has been printed in grey but the block also shows the design painted onto the block. What is showing as brown will be cut away after the first printing.
The next step is to decide what parts of the design I wanted to retain as grey. These areas were then cut away leaving only those areas to be printed in the next colour - black.Since I was printing in black on the prints already printed in grey, registration of the prints was key. I always find this stage difficult and have tried several methods of registration - none being totally successful but again a huge learning curve.  These are the results - are cream, green and orange paper.

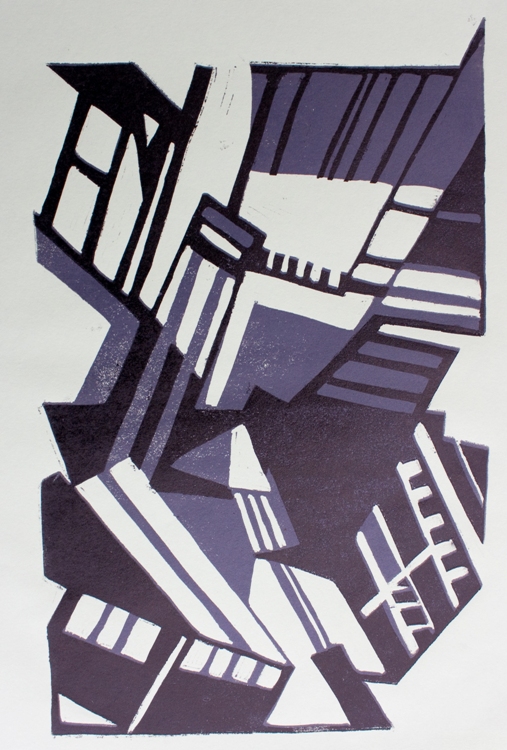
I prefer the orange print but think the design works and it was an interesting project and certainly a method of design I will try again.

Finally on to the assignment. The choice of style abstract or realistic, rural or natural landscape was left to me.  I chose a natural realistic landscape in Wales near Beddgelert.  The view was out-standing, the light changing every few minutes and clouds racing across the Sky.  I made some sketches when we were there ready to start the prints when I got home.  This time the assignment called for a set of three prints of at least three colours.   

I played around with ideas and came up with some designs which I felt captured the atmosphere of the landscape. The  designs I had made were quite small so I tried enlarging one and found that this didn't work so decided to go ahead and print at the same size as the original design.  Again I chose dry point and decided to print the different colours on the plate at the same time - a difficult choice since the plates were so small and another steep learning curve. Here are two versions of each design.


I have learnt a great deal during this assignment about design and refining design but also technical aspects of the printing process - the more I learn the more I realise how much there is to learn. 


Monday 2 April 2012

Visit to Birmingham

I spent a lovely sunny day this week in Birmingham. First we visited the Birmingham and Midland Institute - a wonderful building in itself - to see an exhibition by members of Birmingham Printmakers.  This was a mixed bag but a few items really stood out for technique and image.  The first was a small monoprint by Jenny Escritt.  Just black and white and quite abstract, "Southsea at night 3" was an exercise in restraint but clearly gave the impression of light on water.

Another interesting piece was by an artist called Christine Bradshaw. The screenprint intrigued me by the way the artist had incorporated text into the design and also the space she had left the viewer's eye to rest in. Her work can be seen at http://www.christine-bradshaw.com/gallery.html. Finally, another piece that held my attention was by Chris Doran. "Run, rabbit,run" is a relief and monoprint. A set of six images mounted together and linked by use of texture, colour and to a degree image.  This was an attractive image and an attractive way of presenting the set but let down by a cheap frame.  This led to a discussion with my friends about framing - how a good frame enhances but doesn't overpower an image and how a poor frame always detracts.

We then went to BMAG for a private visit to the Print Room, arranged thanks to my friend, Jennifer. This was a real treat. We saw and handled two Picasso lino cuts, some dry points by Whistler and Tissot, an etching by Rembrandt, an etching by Hossler and finally two drawings by Picasso.

"Head of a bearded man" by Picasso is a reduction print. Wonderful expressive marks and a fantastic example of a cubist portrait.  The registration is spot on but it is the range, power and use of the marks to describe form and movement that is outstanding. http://www.bmagic.org.uk/objects/1962P39.  In contrast the lino cut "Torus Vallauris" shows registration marks and also the marks from cutting in the background of the image but this works for the poster. It is an integal part of the design. My personal preference is to clear the image of cut marks but I can see where they can enhance rather than detract from the image and this is the case with "Torus Valauris".  http://www.bmagic.org.uk/objects/1962P43
 
The other works we saw were equally magical and for over an hour we looked and looked and tried to absorb technique, composition and method.  A major lesson learned when looking at Picasso's drawing and Whistler's drypoints is that less is very often more.  

A wonderful time enhanced by the knowledge and patience of the curator.  I know that in some galleries you can get nose to nose with the image on the wall but being able to look and handle work like this is a fantastic privilege and one that I will not forget for a long time.  Has this experience influenced my own work - oh yes - I can't wait to get to grips with a cubist portrait in lino cut - my homage to Picasso.

Thursday 15 March 2012

wonderful workshops

First up was week one of 3 weekly workshops with Betsy Smith arranged by my local art society - Shropshire Art Society. Her work can be seen at www.twenty-twenty.co.uk.betsy-smith. Betsy is a lovely Shropshire artist who paints from the natural landscape with her feeling and emotion. The workshop theme is "The Inner Eye" - a phrase from Wordsworth poem "Daffodils".

Betsy gave us a still life set-up to look at for 10 mins just to look, not to draw, and then covered it and asked us to draw paint from our memory.  My initial painting was a very sketchy watercolour which I greatly enjoyed doing and featured on the large red parasol, a curvy vase, and butterfly and bird motifs from other items.


Imagining the flowers on the vase that I invented turning into butterflies and birds I painted them floating onto the parasol.


Then came a still life, using some of the same motifs but thinking ahead to a possible print.  Finally, Betsy altered the set-up - gave us another 10 mins. I was very taken with the Buddha' head  and the painting grew from that using colours, symbols that I dragged from my memory. I still remember the lovely peaceful feeling when painting this.

On Saturday came "inspirational Sketchbooks" with Sue Brown, organised by the Twenty Twenty Gallery in Much Wenlock. Sue is an artist/printmaker represented by the gallery - www.twenty-twenty.co.uk/Sue-Brown

Sue showed us a technique called gum arabic transfer and after experimenting with the technique, we spent some lovely time sploshing and splashing paint, texture and colour on to an A3 sheet of cartridge paper. Sue then showed us how to cut and fold it into a small sketchbook. I later glued and trimmed it and cut a stencil in the front page to show off colour from inside since I had been very heavy handed with the black ink and my book is quite dark.

I have made another book ready to be trimmed today for an upcoming trip to Edinburgh. In this second attempt I left a lot of white and pale painting space for new images to be added so I can use it as a real sketchbook and record some of my memories of the trip.  I have already identified some ideas for using the gum arabic transfer for printmaking projects and also the process of making the books as small personalised gifts.
Yesterday was week 2 with Betsy.  She had asked us to bring images/sketches with us to work with.  After showing us some of her original sketches - wonderful loose drawings with all the information she needed, and the paintings that were developed from them, we were given 10-15 mins to look at, not sketch, our chosen images. Because I had spent so much time concentrating on the cedars for Project 1 of my OCA course, I chose to feature the Cedars.  Now I love trees, can draw them - but always feel disappointed with any paintings I make incorporating trees - so this was going to be a challenge.

Betsy suggested colour sketches first especially if using watercolour.  So, after choosing my three colours - I always restrict my paintings to about 3 or 4 colours- this time, magenta, turquoise and cad yellow - perhaps a strange choice but I went with my instinct I completed two sketches.  I liked the magenta trees, so went with that colour way.  The result was quite interesting until after a break for lunch I over-worked it.

However I liked the colours, they made some lovely soft browns and greys and with only a short time to spare, Betsy suggested I have another go with a different colour way and perhaps looking at the number of trees and positioning.  In the final 10 - 15 mins I produced what I think is the best of the bunch.  I broke all the rules - continued working wet into wet, and glazing over wet paint but I quite like it.   Doing this has made me realise how valuable the preparatory and development work is.  I have always leaped in without enough experimenting and looking before, thinking perhaps that I hadn't got the time to do the sketches, the colour sketches, the working out - but the Cedars are a motif I will come back even though I have finally produced the last piece for the first project.


I am not completely happy with the print - it could have been inked a lot better and more evenly but since it is a dry point on plastic, there is a small finite number of images that can be taken.  I will take a final print to eventually send off, concentrating on producing a clean, clear print. However, I feel I am getting closer to producing an image of the Cedars that sums up how I feel about them.

Monday 5 March 2012

Reflecting - its not rocket science

I have been reflecting on the course so far. At first I was disappointed. I seemed to have been working for a long time and to have achieved nothing or rather very little of any account. Mainly due to changes of mind and lack of focus on what I wanted to achieve.

However, have realised that I already have a good idea of what I want from the second project - the urban landscape - therefore my sketching and information retrieval visits will be more productive and provide more relevant material to inform the next piece of work. 

I also feel I would benefit from being more efficient. By thinking ahead to the next projects rather than exclusively focusing on the work in hand, I can make use of those small pockets of time that I have to draw, sketch and work up ideas and also better utilise the resources such as using the inks mixed for one printing to perhaps explore and develop ideas for the future.  Not rocket science but a light bulb moment for me. So the course has already informed my thinking.

I have been looking at dry-points again - a medium which I have always loved to do but also always seek out in exhibitions.  I found two artists that I hadn't come across before - Elizabeth Reed Smith - her dry points of trees are very beautiful especially "Arboreta 11" and as a result I have had yet another rethink about the medium for project 1. I have decided to use dry point - I love drawing trees and dry point is such a drawing medium that I should be able to convey my feelings towards the cedars with this medium where I have been struggling and dissatisfied with lino and woodcut.  Check out her work at www.elizabethsmithprints.com

Another artist I came across was Paul Niemic Jr.  He also uses dry point but in a different way - his image "Wingbeats" of Canada geese taking off is also very beautiful - you can hear the wings clap against the water. His work can be seen at. www.paulniemiec.com

I hesitate to talk about my dry points in the same post as the wonderful artists mentioned above, but  I have been working on a dry point using the portrait from my last post.   I have given the poor model after-eight shadow because I was too heavy with the shadow around her chin but am pleased with the marks in the hair following the form and as a first - a portrait in dry point - I am not too embarrassed to show it here. I have learnt a lot from attempting this so resolve to use the work from life drawing to do more prints - it is a good way of developing techniques in all the print medium without the pressure of thinking it is project work. 

Thursday 23 February 2012

Trials and tribulations

I have been trying out both water and oil based printing inks to see which one produces the result I want.  Have reluctantly come to the conclusion that I prefer the oil based inks. Reluctantly because of the additional 30 mins after the printing session needed to clean up. However more practise at the cleaning up process is meaning that I am getting quicker!

I did get into a real mess with using extender or reducer with the inks. I have realised that I added far too much to the ink and a real sticky (and difficult to clear up) mess resulted.  I had only seen extender used once before and thought I had remembered what to do but memory failure added to the chaos. Still one learns from ones mistakes.

Have been on a couple of pastel workshops recently organised by my local art society.  Good to be thinking of something other than printing for a change.  This painting ended up quite close to the original idea but not a lot like the still life set-up.   The second workshop, I started with a clear idea of colours and mood which was supposed to be calm with blues and light ochres - the colours of the seaside and driftwood. The result was a long way from my vision and very disappointing - where are the peaceful colours and mood of the seaside?    So the painting has been brushed down and the colour knocked back so that the pastel card is waiting for another paint sometime in the future.       
With these pastels, my recent drawings and my printmaking I am still noticing my small alphabet of mark making. The more I look at other artist's work, especially print makers, I feel my own lack. I have been looking at wood engravings in particular and the tones that are arrived at are incredible.I especially like the work of Colin See-Payton - http://www.see-paynton.co.uk/.  We bought one of his engravings last year - his work is fantastic and every time I see his exhibitions I have to resist buying more.

I was pleased with one piece of work I managed at the last life drawing I attended. The model was Marie and she was able to pose with incredible stillness.  She gave us 4 standing poses and for one I could not resist her beautiful profile.  I used a photocopy of this for a dry-point at the society's monthly printmaking workshop yesterday.  I need to clean it up a bit and add emphasis but am pleased with the results so far.  A little bit more work to do before I post the results.

I came across another artist's work yesterday that I have found helpful - Robert Gillmor http://www.pinkfootgallery.com/gillmor.html. He typically uses 10 linoleum blocks - one for each colour for his prints - and I am finding 3 different blocks hard to handle!  His work is stunning though and the more one looks at it the more there is to see.


Monday 30 January 2012

Exhibitions and inspiration

We went to see the Da Vinci Drawings Exhibition and the "lost in Lace" exhibition at Birmingham Museum and Art Gallery.   The queue for the Da Vinci was quite long so we decided to leave it until another day. On the way back we came across an exhibition called "A Life in Prints"  -the Tessa Sidley bequest. Tessa Sidley was the curator for prints and drawings for almost 30 years and died in 2011. She left her collection of prints to the Museum.  A lovely surprise to find so many displayed. 

I was particularly taken by a Lucien Freud etching - " Woman with an arm tattoo".There is also a copy in the Tate and the image can be viewed on their website at www.tate.org.uk. This is the same model as the very controversial painting that was sold for several million a couple of years ago - she was a very large lady and several critics seemed offended by her size, that she was not an appropriate model. I wasn't a fan of the painting which was nothing to do with the size of the lady.  However, the etching is a different story.  The marks Lucien Freud made were wonderful and truly inspiring as I have realised recently that I need to expand my "alphabet" of mark making for both my prints and my paintings/drawings. 

 Another wonderful image was a woodcut by Elaine Kowalsky  called "Woman catching a dream".  The movement in the hair really gives energy to the piece.  It wasn't until I got home and looked at my photos (yes you are allowed to photograph most of the work in the museum - we checked) that I realised that there was a profile in the left hand bottom corner.  I spent so much time with my nose pressed up against the glass of the prints looking at the technique and marks that I forgot to step back and get the bigger picture.

 If you get the chance to visit the museum to see the collection they will repay your interest.  Have also discovered that you can arrange a special visit to see prints in the BMAG collection of over 3000 items, that are not usually on display - so that is another date for the calendar.

Next to the "Lost on Lace" exhibition.  After passing through a small exhibition of very traditional lace and in the main gallery also showing the various tools of the trade, we went over to the Gas Hall. This is a truly stupendous building inside, made marvellous by the exhibits. Not sure what to call them - sculptures spring to mind. They are incredible - I will never think of lace in the same way again!  Difficult to describe as each was so different. Each artist had interpreted the work "lace" in a different way. I was also fascinated with the shadows that the pieces throw on the floor - an incredible event. www.bmag.org.uk/events

One thing I did notice that the lace was accompanied by tools and explanation of how lace is made but the prints were not. The labels just said etchings, woodcut, lino cut etc.  I think it would be a useful addition to have a short explanation of the various methods that are used to produce the prints.  I have found in the past that when I have been explaining to my husband the different methods used I get a small audience listening. Quite disconcerting, but showing that people are interested in knowing more about the techniques involved. Some plates would be good to see as well as the inks and tools.

After the exhibitions we went on to spend an enjoyable 3 hours at Dr Sketchy's  Anti-Art School Birmingham.  A lovely mixture of burlesque show and life drawing. The artistes entertain the audience and then spend between 10 and 20 minutes posing. The artiste then chooses their favourite picture and the artist wins a prize. Quite nerve racking - far more so than the regular life drawing session I attend.  I finally relaxed and concentrated on a portrait of the final model - Miss Tiffany Beau.   www.drsketchybirmingham.co.uk

All in all a fascinating, quite tiring and long day.

Monday 23 January 2012

What makes a masterpiece?

This was an amazing programme on TV the other evening.  It was presented by a scientist who looked at various items of research such as tracking eye patterns over a piece of art, what colour was favourite amongst the viewing public, what happened in people's brains when they viewed art - all to see if a formula for a masterpiece could be evolved.  At the end of the programme the presenter attempted to put all he had learnt into a piece of art in collaboration with an artist who ended up actually putting paint onto the canvas for him.  I won't spoil the punchline - but suffice it to say that the word "humanity" figured heavily in the result.

If you haven't seen it, look out for a repeat - it is well worth the hour - an informative and very interesting hour - no matter what your particular form of creativity is.

P S an apology to readers

I had great trouble posting my last post "Logbooks and sketchbooks". I am still not sure what I was doing wrong, but kept losing what I had typed and had to start again. Still this, together with the fact that I am a two finger typist, is no excuse for mistakes especially spelling. So one of my promises to myself is to be more careful and remember to spell check etc before I post.

Sunday 22 January 2012

Logbooks and sketchbooks

Every student signing on to an OCA course is expected to keep a logbook/journal. Since I have
kept a logbook recording exhibitions, workshops, critical assessments of my own work and images that inspire or are thought provoking in any way for a several years, I was not concerned about this concept although I realised that I do need to develop my thoughts and think more about why a particular image is inspiring or not. It is not enough just to paste a pretty image in a book and say “this is good”! which is what I have, lazily, been prone to do.

A student studying any fine art courses is expected to also keep sketchbooks. These are seen by the tutor assigned to the student and also as part of the assessment process. Not a problem for an artist surely?
However, although I have kept sketchbooks for as long as I have rediscovered art, I do not like people looking at them.   Until I read a comment by an artist calledLinda Wu in Jane Stobart’s new book – Extraordinary Sketchbooks – I hadn’t understood why I felt so secretive about my sketchbooks. Linda says that she found the idea of keeping a sketchbook “quite alien” to her and would produce sketchbooks retrospectively purely for assessment purposes.  This sounded like a good idea! She did not “want to expose my ideas and obsessions to criticism”.  Now she says that “once I became more comfortable with the concept I regretted not having valued the process earlier”.

So criticism of my sketchbooks, perhaps being too untidy, too illogical, not “good enough” lay at the bottom of my unease.  On looking through "Extraordinary Sketchbooks" with a critical eye i.e. by looking and deciding what appealed to me and what didn’t – a very subjective decision I know - I found that one sketchbook that was immaculate, very organised, looking ready to be printed as a book and the one that I envisaged as the “correct” way to keep a sketchbook and the one that I had assumed I should aspire to was the one that inspired me the least! 

I have decided to keep specific sketchbooks for the project work, but will include other sketchbooks for the assessment.  One of the books I will include is what I refer to as my doodle book. This is the book I keep by my chair and often doodle in when watching TV. Immediately I call it a doodle, rather than a drawing, it loses the preciousness and I feel free to make mistakes and to play around with shapes and designs. Weird how the brain works.

I had just started a new doodle book and decided to play around in it with a couple of idea I had had for the first project.   I have chosen the Cedars at Attingham Park, a National Trust property in Shropshire that I love and visit most weeks. I love the Cedars – and always visit them – feel almost a spiritual connection to them – so they were the most obvious subject to choose for the project.  As I sketched them I had noticed the negative shapes of the trunks and branches and also the outline of the top of the trees against the sky, so decided to play with the ides in my doodle book. 
I enjoyed the process and have concluded that perhaps there is not a right way or a wrong way – the only way is what works for the individual.


Sunday 8 January 2012

Sketchbook Project

I signed up for the sketchbook project in October. www.sketchbookproject.com.
The idea is that you have a small sketchbook, supplied by the organisers and you fill this with whatever you want. The sketchbook is returned to the Brooklyn Art Library by 31st January at the latest.
Each sketchbook has a unique barcode which enables it to be loaned from the collection when the collection goes on tour. The books will tour several locations in America before returning to the Brooklyn Art Library where they stay and can be borrowed.
This year, for the first time, the sketchbooks completed and returned from people in UK and Europe will be able to be viewed in London sometime during 2012.
I chose "Along the line" as a title and chose to use the sketchbooks for my daily doodles - taking a line for a walk so to speak through doodles. I also decide to then use 4 of the doodles as inspiration for small linocuts and drawings which I have taped into the sketchbook to indicate how the doodles have been used to create different images. This is the first time I have used the doodles in tis way and this project has made me look back at more of them to play with
I really enjoyed this project although never quite got over the thought"I mustn't make a mistake in this book" which was a bit inhibiting. But I do find that when I start doodling, especially when watching television, I tend to let my mind wander and don't really noticed what I have drawn until after the event.
So, the sketchbook is complete and ready to post. On to the next project